This tutorial describes how to create and charge a custom fee.
A custom fee is a charge against a tenant, or another form of property-related income. Examples of custom fees are: extra deposits for pets, a charge to pay for a credit check, or lawnmowing or other non-standard maintenance fees. You can create custom fees and apply them to tenants.
As an example, the user will create and charge a custom fee of Credit Check, charging $45.00 for this.
the Tools menu, click Options.
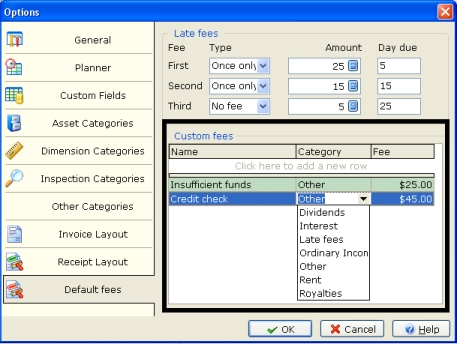
The Options screen displays.
Select the Default Fees option.
Go to the Custom Fees frame and set up the new fee. Click to add a new row, then enter values for:
Name - Name of the new custom fee.
Category - Category that applies to the new fee.
Fee - Amount of the fee.
Click OK. The new Fee is saved and available.
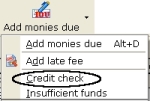
To charge a Tenant a Custom Fee, in the Tenant screen or the Income screen, click the Add Monies Due button, to view its menu. The menu now includes the custom fees, including Credit Check. Select Credit Check.
The Income Details screen displays, with information about the custom fee being charged to the tenant. Enter the information about the fee, and why it is being charged.
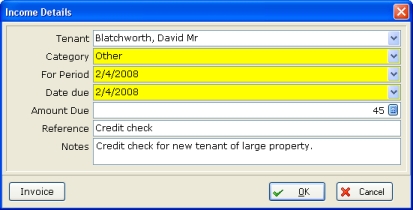
You can use this screen to generate an invoice for this custom fee. To do this, click Invoice.
Once you have created and saved the invoice, click OK.
The monies due are recorded against the tenant.
Tenant - Select the Tenant who paid the Income.
Category - Select the Category of income.
For Period - Select the date period that this income will be applied against.
Date due - Select the date when the Income was due.
Amount Due - Enter the amount due.
Notes - Enter any notes about the income.
Invoice - Click this button to automatically generate a printable or emailable Invoice file.